Wednesday, 23 July 2008
Ripon Cathedral
Sunday, 20 July 2008
Parcevall Hall

The gardens are open to the public and cover 16 acres, with both formal gardens and woodlands. As the gardens are laid out on a steep hillside they are terraced and are quite Italianate in style.

No garden would be complete without water and there is both moving water and formal ponds. The water lilies looked absolutely charming and the round pond had beautiful koi swimming in it.


Each garden has a colour theme, these hot red beds are my favourite. There were astilbe, crocosmia Lucifer, geum, geranium, penstemon and these amazing scarlet double poppies. (Oh for some seed)! I bought a red potentilla for my small garden from the plant shop.


The garden gates are slightly oriental in style and the Yorkshire stone walls make a perfect foil for the plants.

But the most wonderful thing about Parcevall Hall is the view, sweeping across the valley and looking up to Simons Seat. Skyreholme must be very well sheltered because the trees haven't been distorted by the wind and the garden appears to survive our harsh winters.


Oh look! It ISN'T raining. But this is summer in the UK.......

View more pictures of Parcevall Hall on my Flickr.
Saturday, 12 July 2008
Vive La Difference (again)
This year's french vacation was to Brossac, in the Charente region of France. We went san enfants this time, instead we accompanied my eldest sister and her husband for a week of R & R.
We stayed at a beautiful 18 century manoir with bags of character, totally unspoiled, plenty of wildlife and, if a car drove past, this seemed to be an event! The boulangerie was a couple of miles down the road in Brossac and there was a fabulous restaurant overlooking the lake nearby.
Early in the morning and early evening was the best time of the day to see the wildlife. It seemed to get very hot from 11am to 8pm but, once the temperature had cooled slightly, the buzzards came wheeling overhead, searching for carrion. At dusk we saw bats swooping and there were plenty of swifts too. During the day we saw the occasional hen harrier and we had a friendly swift who would sit in the tree every day, chirruping and clicking.
The views across the Charente countryside are fabulous with woodland, corn fields and rolling hills.
Thursday, 3 July 2008
Accordian Books
There is such a great range of papers and cardstock available today to make hand made books with. I have used pre-printed gift wrap and good quality cartridge paper to make this small accordian folded book but I also like to dye my own paper and use batik papers too.
You will need:
1 sheet A3 cartridge paper
1 piece of card stock
1 sheet fancy paper (for your book cover)
pencil
scalpel or similar cutting knife
ruler
bradawl
cutting mat or board
good quality paper glue
thin ribbon (not shown)
sharp scissors (not shown)
First, cut 3 pieces of card stock, using a ruler and scalpel. Accurate cutting is key here. 2 x 3" square (8cm) and 1 x 1" x 3" (3cm x 8cm). Next cut a piece of your fancy paper 7.5" x 3.5" (19cm x 9cm).
Cover each piece of card stock with an even coating of glue. I have used a gel glue but, if your paper glue is a particularly thick kind, leave it for 30 seconds to dry slightly before placing it on the fancy paper. I position the card stock on the paper "by eye" but you may want to measure the position and mark lightly with a pencil on the back of the fancy paper.
Make sure you leave a tiny space between each piece of card so that folding the book cover will not overstretch your paper.
To avoid smudging the glue onto the paper it is advisable to make your book in stages. I place the book cover under a heavy weight (such as a book or the cutting mat) and allow it to dry for 30 minutes. If you do not press your book flat the thin glue will cause it to warp and become misshapen.
Once the glue is thoroughly dry, use sharp pointed scissors to carefully snip the edges of the fancy paper, as shown above. You should also make a small vertical cut at each end of the book's spine. as shown below. This will prevent the paper from bunching around the spine.
Carefully fold down and glue the paper edges over the card stock, taking care not to over-wet the paper with glue. Resist the urge to fold the book yet, instead place it under a weight for another 30 minutes.
Once dry, cut two lengths of thin ribbon and glue these onto the inside of the book, back and front, as shown above. Leave to dry whilst you make the book pages.
Constructing the pages. You will need to measure and cut two strips of cartridge paper 2 3/4" (7cm) x the length of an A3 piece of paper. Draw a guide line on the back of each paper 2 3/4" in from the edge and score your pencil line with a bradawl. Take care not to press too hard with the bradawl or you will tear the cartridge paper.
Now fold the paper along the scored line. Your first fold will be a mountain fold (as shown above) and the pencil mark will be at the back of the paper. This pencil mark won't be visible when the book is finished.
This is how you fold accordian-style pages. If your first fold was a mountain fold then your next one will be a valley fold (the shape of the fold is self-explanatory). You won't need to measure and mark each fold with a pencil and bradawl as long as you fold CAREFULLY and accurately. Fold both strips of paper in this way until you get to the end.
You should have a small strip of surplus paper at the end. I call this piece the "tail". Cut the tail from only ONE strip of paper, you will need the other one.
One strip of paper won't give you enough pages for your accordian book so you need to join two strips together. Take the "tail" from one strip of paper and glue it to the second strip. Make sure that you glue a valley folded piece to a mountain folded piece and that the tail is at the back of your paper (you don't want the tail to be seen when the book is finished). As shown below.
Once dry, fold all the pages together. They should spring apart as you let go to form an accordian.
Nearly finished! Glue the back of the first page to the inside of the front book cover. The first fold facing upwards should be a valley fold. Make sure that your page covers the edge of the ribbon. Press it firmly and leave to dry. (Don't place it under a weight or you will squish the book cover).
Repeat the process by gluing the back page to the inside back cover and leave the book open to to dry.
When dry, carefully fold the pages up and tie the ribbons together to hold them in place.
Voila! You have just made a delightful book that you can fill with drawings, notes, photos or collage. Here are some sites you can buy handmade books.
Saturday, 21 June 2008
Paint and Print on Canvas
Paint and Print is a project that I have recently taught at a local secondary school. The students who created these canvases are in Year 7 (11 and 12 year olds). I hope you will agree that they did a fantastic job by producing amazing art work designed by themselves.
The aim of the ten week project was to make a large piece of wall mounted art, using different techniques of painting and printing. The brief was for the students to study different styles of masks and their meaning including tribal, Venetian, theatre and horror masks.
The objectives of the project were:
to explore various types of paint and print media
to understand the properties and limitations of the paint and print media
to use color theory to obtain a satisfactory outcome
to make their own printing tools
to consider the elements of good design

So how was it done? First the students were asked to select either cool colors or warm colors and, using diluted acrylic paints, applied these to the surface of the canvas using sponges.
Once dry, masking tape was placed on the painted canvas and a thick coat of acrylic paint was applied with a sponge. The students then had the choice of applying different printed elements to the canvas either with the masking tape intact or removing the masking tape before printing.
The printing applications were as follows:
bubble wrap and/or corrugated cardboard, painted with a thick layer of acrylic paint.
Collograph (string on card) printing blocks, painted with metallic acrylic colors before applying to the canvas.
Printing foam scored with a pencil and printing ink applied with a roller before applying to the canvas.
Commercially bought foam stamps painted with acrylic paint before applying to the canvas.
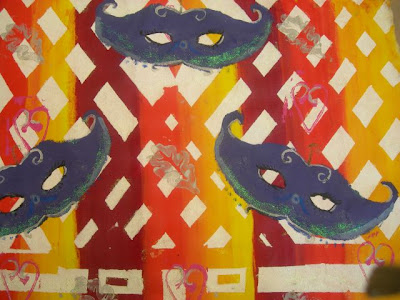
Once the surface had been decorated and the masking tape removed (tearing off the masking tape is such fun)! the canvas was ready for the masks. Each student made a template of a mask from paper and positioned the template onto the canvas before drawing around it with a soft pencil. The mask was painted in a solid color and, when dry, decorated with Jones Tones foils on a transparent glue base.
The Learning Outcomes. As well as learning about planning and design compostition, color theory and the properties of paint, the students also learned that materials behave differently on different surfaces. One of the "problems" of painting on an absorbent surface, such as on fabric or on a wall, is that a dense surface will absorb color but reflect very little light back (unlike white paper, for instance). For example: purple acrylic paint applied directly from the bottle will look black on a non-reflective surface. To achieve a better purple it is advisable to add a small quantity of white paint. Although the paint looks lilac on the palette it will dry to a darker shade. Another problem of color on canvas is one of contrast. Subtlties in shades and tints are lost on a large surface that is viewed from a distance so it is better to employ color "jumps". What I mean by that is, the subtle changes from yellow to tangerine, to orange, to vermilion, to red will be lost in this type of painting. It is advisable to change colors from yellow- orange - red without the subtlties in between.
A further limitation is that of paint handling and working cleanly, particularly in printmaking. Acrylic paint is notoriously difficult to manipulate when painting complex shapes onto thick absorbent canvas and students learned to mix the paint to the exact consistency to make its application easier. Printmaking is a messy business and students were advised to clean their area and printmaking tools thoroughly, particulary as they used oil based inks and turps to clean them up with.
Each student created a unique piece of art, using techniques that can be applied to other painting and print making assignments. a project such as this can be adapted for any age group, the older the student the more elaborate the finished piece can be.


